
Drawing a shining effect animation
-
@Ylvy said in Drawing a shining effect animation:
-width(), -height()
Negative?!
Top right is: width, 0
Bottom left: 0, height@jsulm I'm trying to make the animation start from the bottom left to the top right, you're referring to what value? start value/endvalue of startAnimation or endAnimation? these values are so confuse to me, never worked with QLinearGradient.
-
@jsulm I'm trying to make the animation start from the bottom left to the top right, you're referring to what value? start value/endvalue of startAnimation or endAnimation? these values are so confuse to me, never worked with QLinearGradient.
@Ylvy well, to flip the direction, inverse the y values
startAnimation->setStartValue(QPointF(-width(), height()));
startAnimation->setEndValue(QPointF(width(), -height()));and
endAnimation->setStartValue(QPointF(0, 0));
endAnimation->setEndValue(QPointF(2 * width(), 2 * -height())); -
@jsulm I'm trying to make the animation start from the bottom left to the top right, you're referring to what value? start value/endvalue of startAnimation or endAnimation? these values are so confuse to me, never worked with QLinearGradient.
@Ylvy said in Drawing a shining effect animation:
these values are so confuse to me, never worked with QLinearGradient.
This has nothing to do with the gradient itself. You need to understand what you want to do and how :)
You said, you want to start bottom-left and end top-right.
The coordinate system starts with ( 0 / 0 ) in the top-left corner.So your start would be ( 0 / h ) and end ( w / 0 ).
That's why @jsulm was wondering why you have ( -w / -h ) in there. This would be a point with a distance of w and h top-left above your visible widget area.
-
@Ylvy well, to flip the direction, inverse the y values
startAnimation->setStartValue(QPointF(-width(), height()));
startAnimation->setEndValue(QPointF(width(), -height()));and
endAnimation->setStartValue(QPointF(0, 0));
endAnimation->setEndValue(QPointF(2 * width(), 2 * -height()));@J-Hilk said in Drawing a shining effect animation:
@Ylvy well, to flip the direction, inverse the y values
startAnimation->setStartValue(QPointF(-width(), height()));
startAnimation->setEndValue(QPointF(width(), -height()));and
endAnimation->setStartValue(QPointF(0, 0));
endAnimation->setEndValue(QPointF(2 * width(), 2 * -height()));Yes, this is the direction i was referring to, thanks, any idea why it's not completly disappearing at the end?

-
@Ylvy said in Drawing a shining effect animation:
any idea why it's not completly disappearing at the end?
Because the
startAnimationhas reached its end point. The end point of start is not far enough for the gradient to disappear from the visible button area.
You need to take the length of the gradient into account. It is measured from the front. -
This post is deleted!
-
@Ylvy said in Drawing a shining effect animation:
any idea why it's not completly disappearing at the end?
Because the
startAnimationhas reached its end point. The end point of start is not far enough for the gradient to disappear from the visible button area.
You need to take the length of the gradient into account. It is measured from the front.@Pl45m4 said in Drawing a shining effect animation:
Because the
startAnimationhas reached its end point. The end point of start is not far enough for the gradient to disappear from the visible button area.
You need to take the length of the gradient into account. It is measured from the front.I didn't understand how to measure its length, could you point it?
-
@Pl45m4 said in Drawing a shining effect animation:
Because the
startAnimationhas reached its end point. The end point of start is not far enough for the gradient to disappear from the visible button area.
You need to take the length of the gradient into account. It is measured from the front.I didn't understand how to measure its length, could you point it?
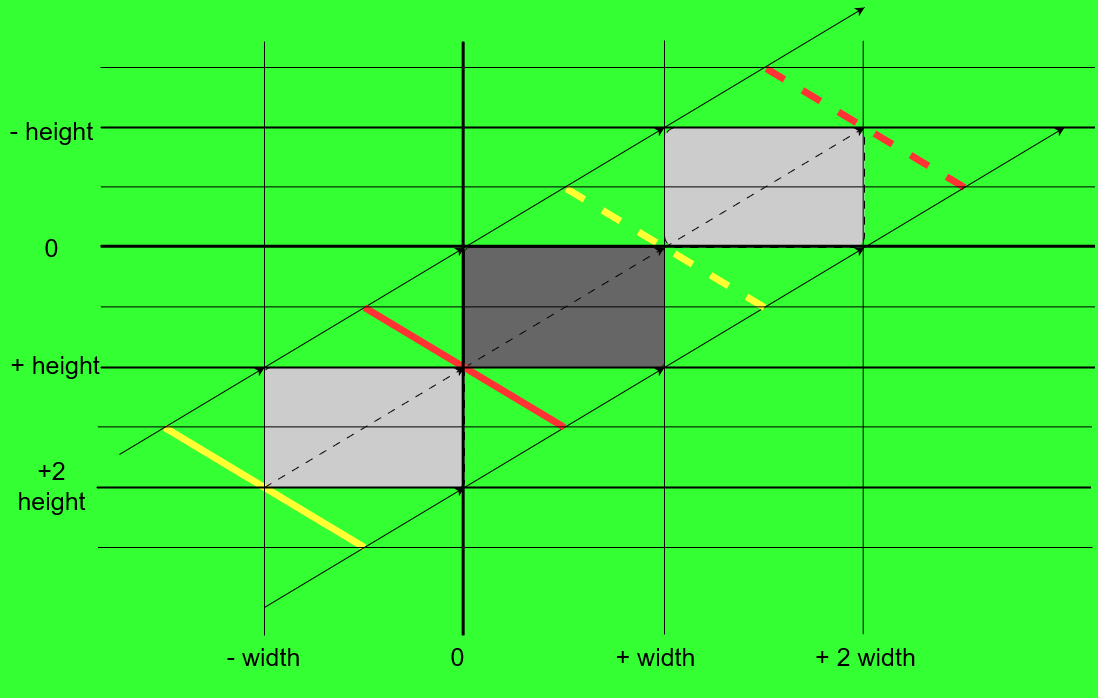
Should be self-explanatory ;-)
Pick any known point.
Dark gray: your button in its own coordinate system
light gray: virtual button rect before and after the animationyellow thick line: gradient start point at the beginning
yellow dashed line: gradient start point at the end of animationred thick line: gradient end point at the beginning
red dashed line: gradient end point at the end of animationThis should keep a fitting gradient angle, even when you have high aspect ratios of like 20:1 or more.
how to measure its length
You dont have to measure it in numbers, which would also be not too complicated since the gradient is "traveling" basically on a hypotenuse of a triangle. So the diagonal lenght is
c = sqrt( a^2 + b^2 )with a = width and b = height.
Btw: if you need continuous looping, you can add
        startAnimation->setLoopCount(-1);
        endAnimation->setLoopCount(-1);
and get rid of the timer.
Looks about like this

Happy coding :)
-
Should be self-explanatory ;-)
Pick any known point.
Dark gray: your button in its own coordinate system
light gray: virtual button rect before and after the animationyellow thick line: gradient start point at the beginning
yellow dashed line: gradient start point at the end of animationred thick line: gradient end point at the beginning
red dashed line: gradient end point at the end of animationThis should keep a fitting gradient angle, even when you have high aspect ratios of like 20:1 or more.
how to measure its length
You dont have to measure it in numbers, which would also be not too complicated since the gradient is "traveling" basically on a hypotenuse of a triangle. So the diagonal lenght is
c = sqrt( a^2 + b^2 )with a = width and b = height.
Btw: if you need continuous looping, you can add
        startAnimation->setLoopCount(-1);
        endAnimation->setLoopCount(-1);
and get rid of the timer.
Looks about like this
Happy coding :)
-
@Pl45m4 said in Drawing a shining effect animation:
Looks about like this
Happy coding :)The struggle is real, I'm trying to achieve exactly the effect on your gif, could you please share the code you used? 🙏
-
@Ylvy said in Drawing a shining effect animation:
The struggle is real
What are you struggling with? Still the coordinates?!
@Pl45m4 I'm using the code i posted in my first answer, then I modified the coordinates to
startAnimation->setStartValue(QPointF(-width(), height()));
startAnimation->setEndValue(QPointF(width(), -height()));
and
endAnimation->setStartValue(QPointF(0, 0));
endAnimation->setEndValue(QPointF(2 * width(), 2 * -height()));
as J.Hilk suggested, then I'm getting the wrong animation end as I posted in the gif above
I see the graphic you post but I still didn't understand what you did to reach the result in your gif (I'm not referring to the loop count).
I meant if you could share your code edited with the fixes? -
@Pl45m4 I'm using the code i posted in my first answer, then I modified the coordinates to
startAnimation->setStartValue(QPointF(-width(), height()));
startAnimation->setEndValue(QPointF(width(), -height()));
and
endAnimation->setStartValue(QPointF(0, 0));
endAnimation->setEndValue(QPointF(2 * width(), 2 * -height()));
as J.Hilk suggested, then I'm getting the wrong animation end as I posted in the gif above
I see the graphic you post but I still didn't understand what you did to reach the result in your gif (I'm not referring to the loop count).
I meant if you could share your code edited with the fixes?@Ylvy said in Drawing a shining effect animation:
I see the graphic you post but I still didn't understand
How?! :D
But, trust me, you need to, otherwise you won't be able to maintain your code or don't know what's going on when you come back to it later.Understanding of the coordinate system is essential for every painting, widget movement, layouting, coordinate mapping and everything else.
The graphic is probably the best illustration of your issue/situation you can get. You know how to read a coordinate system, right?
You just have to pick 4 points from there.- You want the end of your gradient moving completely out of your visible button rect.
- The gradient moves from bottom-left to top-right.
The yellow and red lines are already possible ways to get what I did.
Solid line for the beginning of the animation and the dashed lines for the end.
Yellow the start and red the endpoint of every "event".
The black, dashed line with the arrow in the middle show the "movement" of the gradient -
@Ylvy said in Drawing a shining effect animation:
I see the graphic you post but I still didn't understand
How?! :D
But, trust me, you need to, otherwise you won't be able to maintain your code or don't know what's going on when you come back to it later.Understanding of the coordinate system is essential for every painting, widget movement, layouting, coordinate mapping and everything else.
The graphic is probably the best illustration of your issue/situation you can get. You know how to read a coordinate system, right?
You just have to pick 4 points from there.- You want the end of your gradient moving completely out of your visible button rect.
- The gradient moves from bottom-left to top-right.
The yellow and red lines are already possible ways to get what I did.
Solid line for the beginning of the animation and the dashed lines for the end.
Yellow the start and red the endpoint of every "event".
The black, dashed line with the arrow in the middle show the "movement" of the gradient -
@Pl45m4 why you cant share the code you used? it would be easy to me understand reading it, i already told you many times im having difficult in understand this.
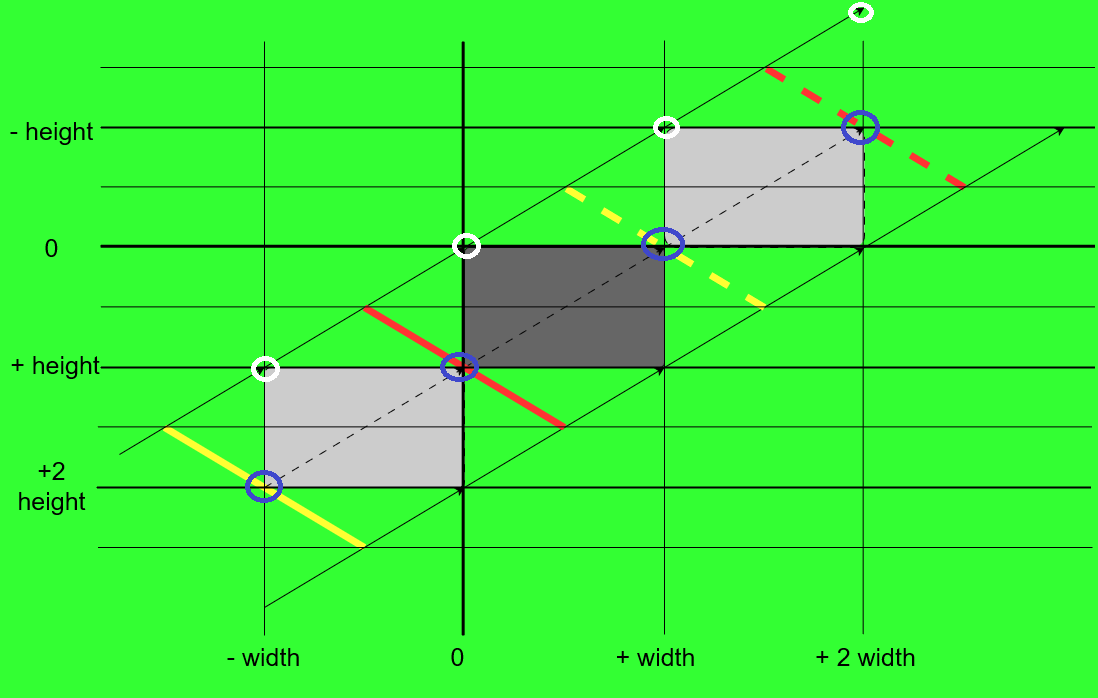
The points used by @J-Hilk are marked with white circles, the points I use have blue markers.
I tested it again now and @J-Hilk 's approach worked for me as well.
My coordinates are evenly distributed before and after the button, while @J-Hilk included the ( 0 / 0 ) point in his approach and therefore the "fade in" time is shorter, than the "fade out" time (not the actual animation time, but the time where you see the gradient moving over the visible button area).
After all it's a matter of taste how you do it and which points you use for better understanding.The reason why your gradient still stops before leaving the button, even when using @J-Hilk 's or my points, I can't tell at the moment.
Could be an issue with your overall design ( I only used the content ofsetAnimationfunction inside the c'tor and thepaintEventfrom your class).Edit:
@Ylvy said in Drawing a shining effect animation:
ShineButton* button = new ShineButton(this);
button ->setGeometry(200, 200, 140, 40);
button->show();
I'm just seeing this right now...
You don't have real "resize handling", which is needed to have the right angles and starting/stopping points at all time.
You callsetAnimationonly once in your c'tor, set the points and start the property animation. Then you use the animated points in yourpaintEvent, which is not "wrong", but after resizing your button manually after calling its c'tor hereShineButton* button = new ShineButton(this); button ->setGeometry(200, 200, 140, 40);the
shine(Start/End)Pointvalues are already off... because they are still configured to the initial button size, which was set in c'tor or by button's parent layout, if any (I know you used it as stand-alone widget), while the animation keeps running and using the initial values.Just paint these points with
painter.drawPoint(....)in yourpaintEventusing a thickQPenwith a bright color and you will see where your gradient is actually moving and where it is stopping ;-) -
The points used by @J-Hilk are marked with white circles, the points I use have blue markers.
I tested it again now and @J-Hilk 's approach worked for me as well.
My coordinates are evenly distributed before and after the button, while @J-Hilk included the ( 0 / 0 ) point in his approach and therefore the "fade in" time is shorter, than the "fade out" time (not the actual animation time, but the time where you see the gradient moving over the visible button area).
After all it's a matter of taste how you do it and which points you use for better understanding.The reason why your gradient still stops before leaving the button, even when using @J-Hilk 's or my points, I can't tell at the moment.
Could be an issue with your overall design ( I only used the content ofsetAnimationfunction inside the c'tor and thepaintEventfrom your class).Edit:
@Ylvy said in Drawing a shining effect animation:
ShineButton* button = new ShineButton(this); button ->setGeometry(200, 200, 140, 40); button->show();I'm just seeing this right now...
You don't have real "resize handling", which is needed to have the right angles and starting/stopping points at all time.
You callsetAnimationonly once in your c'tor, set the points and start the property animation. Then you use the animated points in yourpaintEvent, which is not "wrong", but after resizing your button manually after calling its c'tor hereShineButton* button = new ShineButton(this); button ->setGeometry(200, 200, 140, 40);the
shine(Start/End)Pointvalues are already off... because they are still configured to the initial button size, which was set in c'tor or by button's parent layout, if any (I know you used it as stand-alone widget), while the animation keeps running and using the initial values.Just paint these points with
painter.drawPoint(....)in yourpaintEventusing a thickQPenwith a bright color and you will see where your gradient is actually moving and where it is stopping ;-) -
@Pl45m4 said in Drawing a shining effect animation:
My coordinates are evenly distributed before and after the button,
share the code you use, ignore the one i post
@Ylvy said in Drawing a shining effect animation:
share the code you use, ignore the one i post
Like you ignored what I wrote?! ;-)
You have more than you need to figure out how to solve it.
I wont code the complete resize handling for you...To quickly get what I did, set the geometry before setting up your animation with
setAnimation(or change the structure completely) and then don't resize your button. It will work until the size changes.For example like this:
ShineButton(QWidget* parent = nullptr) : QPushButton(parent)
{
    setGeometry(200, 200, 140, 40);
    setAnimation(1000, 2000);
};
If you want your animation to update "live" according to your button size, you have to use the
resizeEventanyway and reset the start- and endpoints of your gradient to match your button's new size.As it is now, while the gradient animation is running, it won't react on any size changes, as you called
setAnimationonce in your constructor.Cheers.
-
@Ylvy said in Drawing a shining effect animation:
share the code you use, ignore the one i post
Like you ignored what I wrote?! ;-)
You have more than you need to figure out how to solve it.
I wont code the complete resize handling for you...To quickly get what I did, set the geometry before setting up your animation with
setAnimation(or change the structure completely) and then don't resize your button. It will work until the size changes.For example like this:
ShineButton(QWidget* parent = nullptr) : QPushButton(parent)
{
    setGeometry(200, 200, 140, 40);
    setAnimation(1000, 2000);
};
If you want your animation to update "live" according to your button size, you have to use the
resizeEventanyway and reset the start- and endpoints of your gradient to match your button's new size.As it is now, while the gradient animation is running, it won't react on any size changes, as you called
setAnimationonce in your constructor.Cheers.
@Pl45m4 said in Drawing a shining effect animation:
Like you ignored what I wrote?! ;-)
I don't, if I had understood I wasn't still asking.
I wont code the complete resize handling for you...
I'm not asking for this, I had asked for the code you used on your gif nothing more, doesn't matter what you modified.
-
@Pl45m4 said in Drawing a shining effect animation:
Like you ignored what I wrote?! ;-)
I don't, if I had understood I wasn't still asking.
I wont code the complete resize handling for you...
I'm not asking for this, I had asked for the code you used on your gif nothing more, doesn't matter what you modified.
@Ylvy said in Drawing a shining effect animation:
I had asked for the code you used on your gif nothing more, doesn't matter what you modified.
tbh, I didn't modified that much... I changed the coodinates as I already told you, changed the place in my code where I actually resize (it will already work when you put the resize before
setAnimation. No dynamic resizing but for a static button) and played around with the "size" ( = stretch) of the gradient...
You can stretch the gradient by adding multiples of your width and height to the start/end position.There is no "one" version of code. Cant remember the size of the button, but IIRC I doubled the size by using 4 instead of 2.
So instead of
endAnimation->setStartValue(QPointF(0, height()));
endAnimation->setEndValue(QPointF(2 * width(), - height()));
I use for example:
endAnimation->setStartValue(QPointF(0, height() * 2));
endAnimation->setEndValue(QPointF(2 * 2 * width(), - height() * 2));