
Replicating Microsoft's Acrylic
-
I'd like to implement an effect similar to Microsoft's Acrylic in QML for the background of my
QQmlApplicationEngine-based app (examples). I'd prefer to not use any platform-specific hacks, as I want to use this in a cross-platform setting.Before I go any farther, I should mention that I have read this, this (seems to be unanswered, and links to a deleted thread), and this (which is Windows-only and might actually be Glass instead of Acrylic).
So far, I've come up with this on my own:
import QtQuick 2.12
import QtQuick.Window 2.12
import QtGraphicalEffects 1.0

Window {
    id: root

    color: "transparent"

    FastBlur {
        id: blur
        source: root
        anchors.fill: root
    }

    visible: true
    width: 640
    height: 480
    title: qsTr("Hello World")
}
but that just makes a black, opaque window. I've also dabbled with using
Item.grabToImage()on the root and setting an image to display that but that doesn't work either.So my question is, is Acrylic possible in QML? Where do I go from here? Also, is it possible to achieve Acrylic with a
QQmlApplicationEngineor do I need to switch to something else?System info: Ubuntu 20.04, KDE Plasma 5.18.5, Qt 5.12.8 (minimum targeted version)
-
I had no idea of Microsoft Acrylic until I read your question. I thought I'd have a crack at it, albeit, I am using Windows not Ubuntu.
QML Materials might be the way to go using Pane to create the coloured (red, orange & white) rectangles, blurring the image behind is not so easy for me, but below is the code and a screenshot of my efforts, hope it helps somehow.
import QtQuick 2.12
import QtGraphicalEffects 1.0
import QtQuick.Controls 2.12
import QtQuick.Controls.Material 2.12

ApplicationWindow {
    visible: true
    color: "#652929"
    width: 1000; height: 480
    title: qsTr("Acrylic in QML, maybe")

    Item {
        width: parent.width
        height: parent.height
        id: root
        MainImage { id: image; anchors.centerIn: root }
        Pane {
            id: redPane
            x: 100; y: 70; width: 400; height: 260
            background: Rectangle { opacity: 0.65; color: Material.color(Material.DeepOrange) }
        }
        MouseArea {
            propagateComposedEvents: true
            anchors.fill: parent
            drag.target: redPane
            drag.axis: Drag.XandYAxis
            drag.minimumX: 0
            drag.maximumX: 800
            drag.minimumY: 0
            drag.maximumY: 480
        }
        Pane {
            id: orangePane
            x: 380; y: 150; width: 250; height: 250
            background: Rectangle { opacity: 0.75; color: Material.color(Material.Orange) }
        }
        MouseArea {
            propagateComposedEvents: true
            anchors.fill: parent
            drag.target: orangePane
            drag.axis: Drag.XandYAxis
            drag.minimumX: 0
            drag.maximumX: 800
            drag.minimumY: 0
            drag.maximumY: 480
        }
        Pane {
            id: whitePane
            x: 550; y: 50; width: 250; height: 250
            background: Rectangle { opacity: 0.75; Material.theme: Material.Light }
        }
        MouseArea {
            propagateComposedEvents: true
            anchors.fill: parent
            drag.target: whitePane
            drag.axis: Drag.XandYAxis
            drag.minimumX: 0
            drag.maximumX: 800
            drag.minimumY: 0
            drag.maximumY: 480
        }
    }
}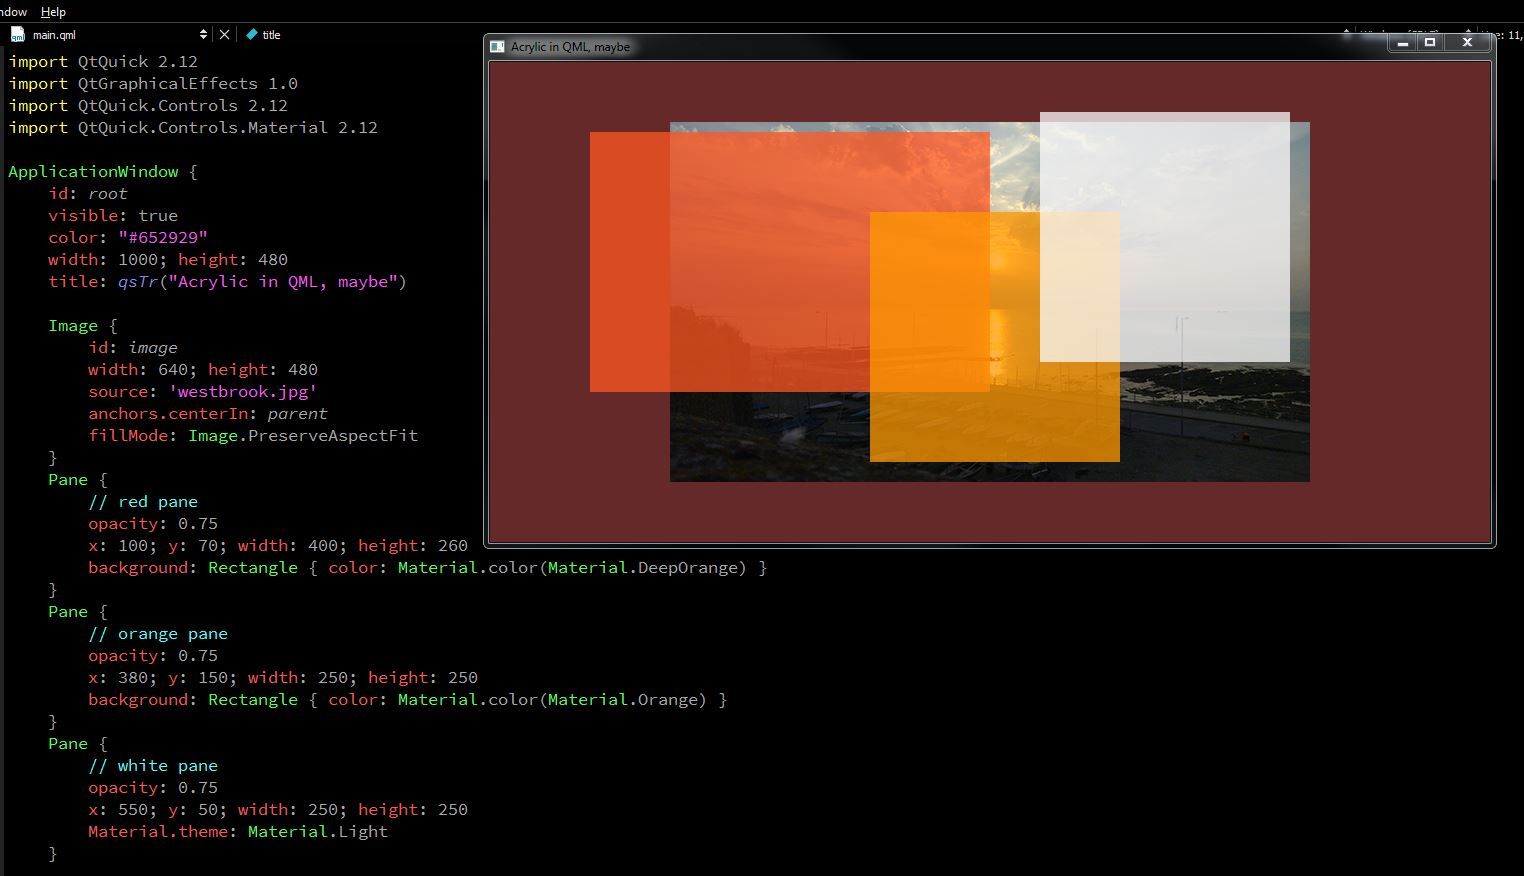
Don't just sit there standing around, pick up a shovel and sweep up!
I live by the sea, not in it.
-
I had no idea of Microsoft Acrylic until I read your question. I thought I'd have a crack at it, albeit, I am using Windows not Ubuntu.
QML Materials might be the way to go using Pane to create the coloured (red, orange & white) rectangles, blurring the image behind is not so easy for me, but below is the code and a screenshot of my efforts, hope it helps somehow.
import QtQuick 2.12 import QtGraphicalEffects 1.0 import QtQuick.Controls 2.12 import QtQuick.Controls.Material 2.12 ApplicationWindow { visible: true color: "#652929" width: 1000; height: 480 title: qsTr("Acrylic in QML, maybe") Item { width: parent.width height: parent.height id: root MainImage { id: image; anchors.centerIn: root } Pane { id: redPane x: 100; y: 70; width: 400; height: 260 background: Rectangle { opacity: 0.65; color: Material.color(Material.DeepOrange) } } MouseArea { propagateComposedEvents: true anchors.fill: parent drag.target: redPane drag.axis: Drag.XandYAxis drag.minimumX: 0 drag.maximumX: 800 drag.minimumY: 0 drag.maximumY: 480 } Pane { id: orangePane x: 380; y: 150; width: 250; height: 250 background: Rectangle { opacity: 0.75; color: Material.color(Material.Orange) } } MouseArea { propagateComposedEvents: true anchors.fill: parent drag.target: orangePane drag.axis: Drag.XandYAxis drag.minimumX: 0 drag.maximumX: 800 drag.minimumY: 0 drag.maximumY: 480 } Pane { id: whitePane x: 550; y: 50; width: 250; height: 250 background: Rectangle { opacity: 0.75; Material.theme: Material.Light } } MouseArea { propagateComposedEvents: true anchors.fill: parent drag.target: whitePane drag.axis: Drag.XandYAxis drag.minimumX: 0 drag.maximumX: 800 drag.minimumY: 0 drag.maximumY: 480 } } }@Markkyboy: the problem with your implementation is that it is missing the blur effect.
I did some fooling around recently and came up with this:
import QtQuick 2.12
import QtQuick.Window 2.12
import QtQuick.Controls 2.12
import QtGraphicalEffects 1.0

Window {
    id: root

    color: "white"
    visible: true
    width: 640
    height: 480
    title: qsTr("Hello World")

    Image {
        id: img

        source: "qrc:/msofttest.png"
        anchors.fill: parent
        fillMode: Image.PreserveAspectCrop

        Rectangle {
            id: rect

            color: "white"
            opacity: 0.6
            anchors.left: parent.left
            anchors.top: parent.top
            width: parent.width
            height: parent.height * 0.6
        }

        ShaderEffectSource {
            id: ses

            anchors.centerIn: rect
            width: rect.width
            height: rect.height
            sourceItem: img
            sourceRect: Qt.rect(x, y, width, height)
        }

        GaussianBlur {
            source: ses
            anchors.fill: ses
            radius: 64
            samples: 1 + radius * 2 // as per Qt docs
        }
    }
}
which produces:
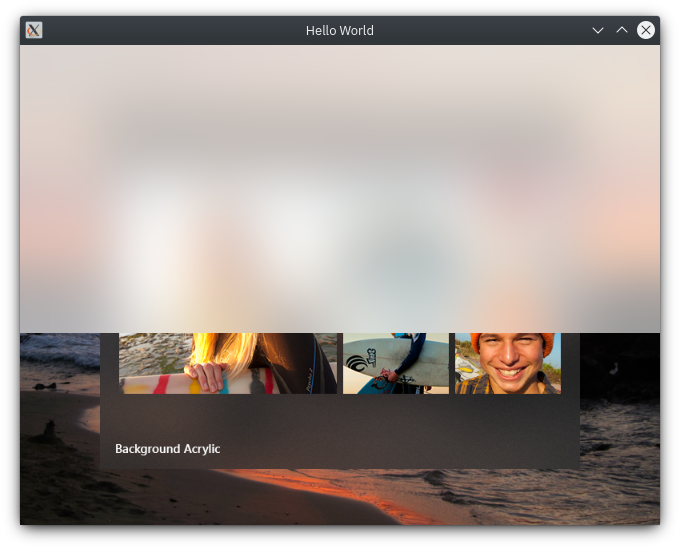
(
msofttest.pngis the first image under "Acrylic Blend Types" in the Windows docs.)Using a different image produces a similar effect. Here I show an Acrylic-esque rectangle in the middle of the image using the following Rectangle instead of the one used earlier:
        Rectangle {
            id: rect

            color: "white"
            opacity: 0.4
            anchors.centerIn: parent
            height: parent.height / 2
            width: height
        }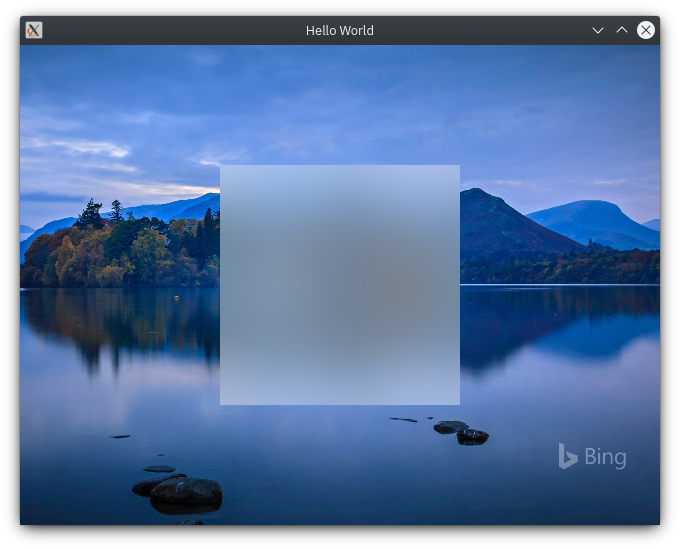
This gives me something that I can go off of to create in-app Acrylic. However, I'm still not sure how to do what I really wanted to do: use Acrylic as the app's background (this site has some screenshots of what I'd like to do, although it's XAML instead of QML).
(I realize that I may not have clearly stated that I wanted the window background in Acrylic; I've updated my first post to be more specific.)