
How to take down padding from some cells in QTableWidget
-

I have the following QTableWidget, with all the cells being instances of QTableWidgetItem Except first cell which holds a QPushButton. Now how can I take down the padding from the cell containing the button and leave padding as is for other cells, since I have this QStyleSheet ruleQTableWidget::item { padding: 5px 10px; }Using PyQt6 and please if the solution involves using a Delegate to explain well how this can be accomplished, since I find it really hard do understand the Delegate class and its methods. Thanks
-
I have the following QTableWidget, with all the cells being instances of QTableWidgetItem Except first cell which holds a QPushButton. Now how can I take down the padding from the cell containing the button and leave padding as is for other cells, since I have this QStyleSheet ruleQTableWidget::item { padding: 5px 10px; }Using PyQt6 and please if the solution involves using a Delegate to explain well how this can be accomplished, since I find it really hard do understand the Delegate class and its methods. Thanks
@rida_zouga
You cannot use stylesheet to achieve any difference between individual cells/columns.QTableWidget::item {applies to all items and cannot be "qualified" to apply only to some.Nor is there some setting on a
QTableWidgetItemor the underlyingsetItem(index, value, some-role)to control padding. Padding is just a paint area feature.So, yes, you do need to write a delegate and attach it to your table. Although they seem intimidating initially they are actually very simple once you use them.
Here is complete PyQt6 program showing what you are wanting to achieve:
import sys
from PyQt6.QtWidgets import (
    QApplication, QStyledItemDelegate, QStyleOptionViewItem, QTableWidget, QTableWidgetItem)
from PyQt6.QtGui import QColor
from PyQt6.QtCore import Qt

class TableDelegate(QStyledItemDelegate):
    def paint(self, painter, option, index):
        option = QStyleOptionViewItem(option)

        # for all cells/items *other than* those in column 0
        # adjust the rectangle to draw/paint in for the padding at each side
        if index.column() != 0:
            option.rect.adjust(10, 5, -10, -5)

        # Visualise the actual non-padded area, just so you can see what the effect is
        painter.save()
        painter.fillRect(option.rect, QColor(255, 255, 0, 120))
        painter.restore()

        # allow the cell to be painted, with its rectangle having been potentially changed above
        super().paint(painter, option, index)


if __name__ == "__main__":
    app = QApplication(sys.argv)
    tw = QTableWidget(5, 5)
    for row in range(5):
        for col in range(5):
            tw.setItem(row, col, QTableWidgetItem("Hello"))
    # Create an instance of your delegate class and attach it to the table widget
    tw.setItemDelegate(TableDelegate())
    tw.show()
    sys.exit(app.exec())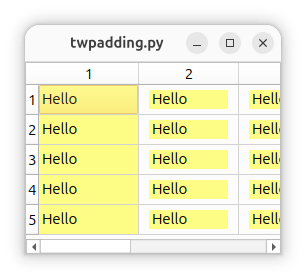
-
R rida_zouga has marked this topic as solved
-
@JonB Thank you for the response, I get it know, though I have to ask if there is a way now for that padding to happen to text only (for example for 2nd column cells) but background-color of cell contains the entire cell, thus that yellow background reaches the table gridlines.
-
@JonB Thank you for the response, I get it know, though I have to ask if there is a way now for that padding to happen to text only (for example for 2nd column cells) but background-color of cell contains the entire cell, thus that yellow background reaches the table gridlines.
@rida_zouga
I am not sure I understand you. Perhaps someone else does? Per the comment, I only put that yellow in so you can see which cells have padding and which do not. (I don't have your icon for column 0 to show.) You would not have thefillRect()code in your actual project. Other than that it just does what yourpadding: 5px 10px;did to all cells except those in column 0.If you know you want it to apply/not apply to a given column where you know the column number (e.g. your "2nd column cells") it already does that. If you are asking for some reason if you can examine the cell content dynamically at runtime (e.g. for "text" or "empty" etc.) then, yes, we can make it do that, but is that what you really mean? Otherwise you would have to spell out just what you intend.
-
@rida_zouga
I am not sure I understand you. Perhaps someone else does? Per the comment, I only put that yellow in so you can see which cells have padding and which do not. (I don't have your icon for column 0 to show.) You would not have thefillRect()code in your actual project. Other than that it just does what yourpadding: 5px 10px;did to all cells except those in column 0.If you know you want it to apply/not apply to a given column where you know the column number (e.g. your "2nd column cells") it already does that. If you are asking for some reason if you can examine the cell content dynamically at runtime (e.g. for "text" or "empty" etc.) then, yes, we can make it do that, but is that what you really mean? Otherwise you would have to spell out just what you intend.
@JonB
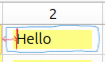
In other words the text stays where it is in that position away from the gridline (shown by red line in image), but the space with white background (shown by surrounding blue line) has the yellow background-color as well. Thus the padding only pushed the text, but the cell entire background-color is yellow. and Thanks once again. -
@JonB
In other words the text stays where it is in that position away from the gridline (shown by red line in image), but the space with white background (shown by surrounding blue line) has the yellow background-color as well. Thus the padding only pushed the text, but the cell entire background-color is yellow. and Thanks once again.@rida_zouga
I am sorry but I still do not know what you are asking. In your descriptions I am afraid I am not sure which bits you want versus which you do not.If it helps: you can first fill the whole of the rectangle
fillRect(option.rect)to get a background color on the rectangle passed in and then calloption.rect.adjust()to reduce the rectangle for the padding. If that is what you wanting to achieve? Just change the order:painter.fillRect(option.rect, QColor(255, 255, 0, 120)) option.rect.adjust(10, 5, -10, -5) super().paint(painter, option, index) -
-
THAT'S EXACTLY WHAT I WANT. THANK YOU SO MUCH!
@rida_zouga
OK :) Now that you are using the color just for the background and filling first you can drop the alpha/opacity, e.g.QColor(255, 255, 0)should be pure yellow. Mine was just for illustration.
