
Conditional borders on QTableWidget cells?
-
What would be the 'proper' way to implement borders that would be programmatically applied to some, but not all, of the cells in a QTableWidget?
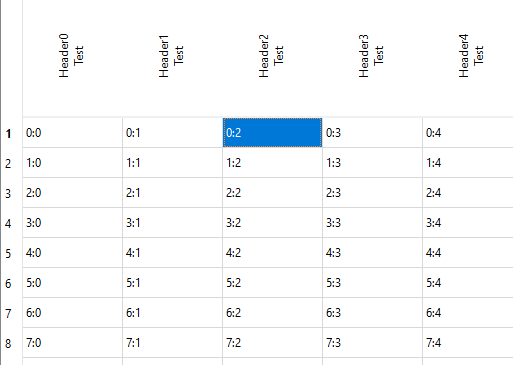
For example I have a test table that looks like this:
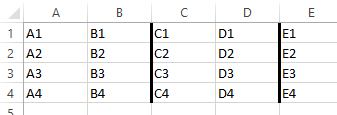
And I want to be able to put borders on certain cells, so it would look something like this (this is an Excel screenshot as an example):
How would I go about accomplishing this in Qt (PyQt5) please? I'm not sure where to start. I expect I'll need to use a QPainter- but where and when?
The QTableWidget is already subclassed in my main program, and I can subclass each QTableWidgetItem if necessary, but the QTableWidgetItem doesn't seem to have a paintEvent (according to PyCharm) so I'm not sure where my code for conditional drawing of borders would be inserted?
I can provide the code for my example above if it helps but this is more of a general "how to?" question than a problem in that code I think.
-
What would be the 'proper' way to implement borders that would be programmatically applied to some, but not all, of the cells in a QTableWidget?
For example I have a test table that looks like this:
And I want to be able to put borders on certain cells, so it would look something like this (this is an Excel screenshot as an example):
How would I go about accomplishing this in Qt (PyQt5) please? I'm not sure where to start. I expect I'll need to use a QPainter- but where and when?
The QTableWidget is already subclassed in my main program, and I can subclass each QTableWidgetItem if necessary, but the QTableWidgetItem doesn't seem to have a paintEvent (according to PyCharm) so I'm not sure where my code for conditional drawing of borders would be inserted?
I can provide the code for my example above if it helps but this is more of a general "how to?" question than a problem in that code I think.
@donquibeats said in Conditional borders on QTableWidget cells?:
I'm not sure where my code for conditional drawing of borders would be inserted
this is more of a general "how to?" question than a problem in that code I think
You have two possible approaches:
-
Use a
QStyledItemDelegateto do the cell drawing. You attach that viaQAbstractItemView::setItemDelegate(). https://doc.qt.io/qt-5/qtwidgets-itemviews-stardelegate-example.html illustrates this. -
Try to do it somehow via stylesheet rules. However, since
QTableWidgetItemis not aQWidgetand so cannot be directly addressed from stylesheet, I'm not sure how to go about that. So I suggest the first alternative :)
-
-
Thanks for the response.
I had already looked at that page and attempted to use
QStyledItemDelegate, but it hadn't worked and I'd assumed I'd been looking in the wrong direction.Below is my test code which, in my theory, ought to draw a thicker black line on the left side of every cell thanks to these lines:
qr = QRect(option.rect.x(), option.rect.y(), 5, option.rect.height())
        painter.fillRect(qr, qb)
I know the subclassing is being reached, at least, because when I comment out the line
super().paint(painter, option, index)the cells are painted empty.However when I run the code, the table is displayed plain, and the
fillRect()doesn't seem to have any effect. I must be doing something wrong. Any pointers would be welcome?import sys from PyQt5 import QtCore, QtGui from PyQt5.QtCore import QRect from PyQt5.QtGui import QBrush from PyQt5.QtWidgets import QApplication, QTableWidget, QTableWidgetItem, QGridLayout, QFrame, QDialog, \ QStyledItemDelegate class TestDelegate(QStyledItemDelegate): def __init__(self): super().__init__() def paint(self, painter: QtGui.QPainter, option: 'QStyleOptionViewItem', index: QtCore.QModelIndex) -> None: self.initStyleOption(option, index) super().paint(painter, option, index) qb = QBrush() qr = QRect(option.rect.x(), option.rect.y(), 5, option.rect.height()) painter.fillRect(qr, qb) class TableTestDialog(QDialog): def __init__(self, window_title): super().__init__() self.setWindowTitle(window_title) self.layout = QGridLayout(self) self.table = QTableWidget() rowCount, columnCount = 40, 40 self.table.setItemDelegate(TestDelegate()) self.table.setRowCount(rowCount) self.table.setColumnCount(columnCount) for c in range(0, columnCount): self.table.setHorizontalHeaderItem(c, QTableWidgetItem("Header" + str(c) + "\nTest")) for r in range(0, rowCount): for c in range(0, columnCount): text = str(r) + ":" + str(c) self.table.setItem(r, c, QTableWidgetItem(text)) self.innerLayout = QGridLayout() self.innerLayoutFrame = QFrame() self.innerLayoutFrame.setLayout(self.innerLayout) self.innerLayout.addWidget(self.table) self.layout.addWidget(self.innerLayoutFrame, 0, 0) if __name__ == '__main__': app = QApplication(sys.argv) windowTitle = "Table test" testDialog = TableTestDialog(windowTitle) testDialog.show() sys.exit(app.exec_()) -
The lines are painted independently from the cells. You have to overwrite paintEvent for this and do all the painting by yourself - maybe first call the base class and then redraw the lines
-
Sorry, perhaps I'm overlooking the obvious here, but "first call the base class and then redraw the lines" is exactly what I thought I was already doing in these lines:
    def paint(self, painter: QtGui.QPainter, option: 'QStyleOptionViewItem', index: QtCore.QModelIndex) -> None:
        self.initStyleOption(option, index)
        super().paint(painter, option, index)
        qb = QBrush()
        qr = QRect(option.rect.x(), option.rect.y(), 5, option.rect.height())
        painter.fillRect(qr, qb)
But that doesn't work, as above.
So there's something I'm still not understanding about the structure I need to use...?
-
I already said it's not the cell painting but the QTableView's one.
-
Use:
def paint(self, painter: QtGui.QPainter, option: 'QStyleOptionViewItem', index: QtCore.QModelIndex) -> None: super().paint(painter, option, index) painter.save() pen = QPen(QColor("black")) qr = QRect(option.rect) qr.setWidth(pen.width()) painter.setPen(pen) painter.drawRect(qr) painter.restore() -
Thanks @eyllanesc that's exactly what I was missing, and it works perfectly.
I've been able to adapt this and add extra code to the subclassed
QStyledItemDelegateso that I'm able to show borders on certain cells as appropriate, such as in this date table where the borders are a neat way to visually indicate weeks: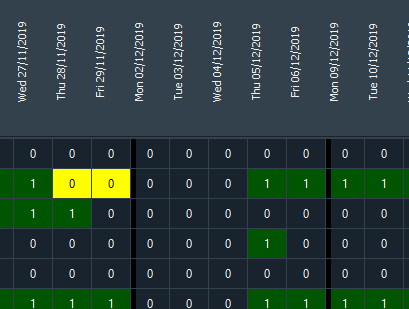
This is exactly what I was hoping to accomplish so many thanks for your help.
-
@donquibeats if you don't mind can you share the extra code you added to customize the borders.
I'm trying to do something similar, highlight borders to range of cells/multiple rows to enclose like a rectangle/square shown in image.
-
@donquibeats if you don't mind can you share the extra code you added to customize the borders.
I'm trying to do something similar, highlight borders to range of cells/multiple rows to enclose like a rectangle/square shown in image.@eyllanesc @JonB @Christian-Ehrlicher if any suggestions from your side is also will be of great help. I'm just starting out with pyqt5
-
@donquibeats if you don't mind can you share the extra code you added to customize the borders.
I'm trying to do something similar, highlight borders to range of cells/multiple rows to enclose like a rectangle/square shown in image.@abdv17 how did you do that?